
PostGIS is the spatial extension of the open source database management system PostgreSQL. It helps you to manage your data (vector and raster) within a coherent geodatabase through a variety of spatial functions. Having a spatial database, the times of data clutter and messiness are over, especially when you are dealing with big data. Initially PostGIS was created to for the handling of vector data only. However, during the recent years more and more raster handling functionalities were introduced. For a complete overview of spatial raster operators, have a look at: http://postgis.net/docs/manual-2.1/RT_reference.html
Download and install PostgreSQL and PostGIS
Download PostgreSQL from here: http://www.postgresql.org/download/
The installer for PostgreSQL includes the PostgreSQL server, pgAdmin III; a GUI for managing and developing your databases, and StackBuilder; a package manager that can be used to download and install additional PostgreSQL applications and drivers. From the StackBuilder GUI, select Spatial Extensions and install the respective PostGIS 2.2 Bundle for PostgreSQL.
Create a new spatial database
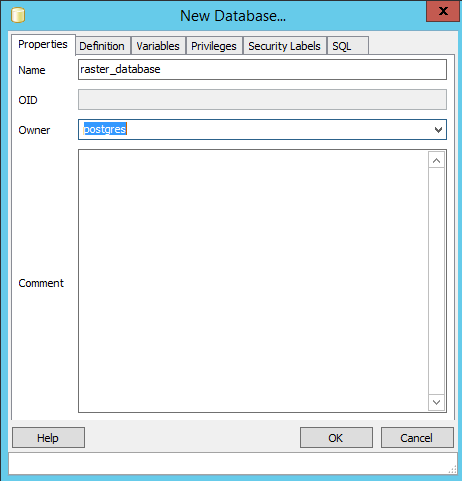
In pgAdmin, create a new database (right click: New Database):
and the spatial extension postgis (right click on Extensions: New Extension):
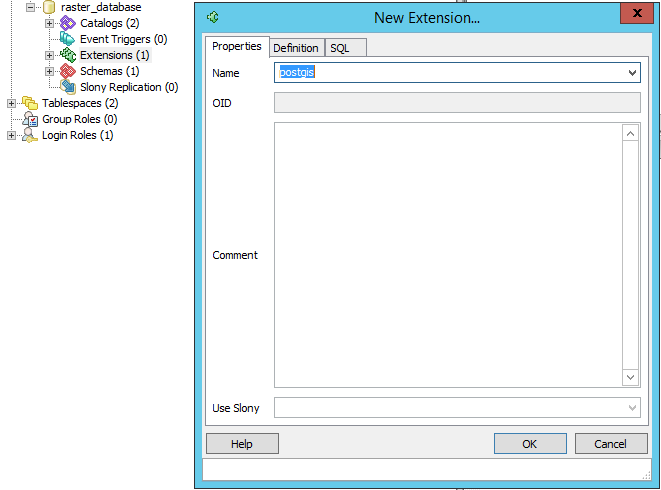
This will create a first table within your DB: spatial_ref_sys that contains the coordinate systems, map projections and the spatial indeces.
Set up Python
Python provides awesome functionality for the automated raster processing within PostGIS. Automatization is necessary especially when you deal with a lot of data and iterative processes. Python scripting is also needed as the pgAdmin GUI does not support the access of all functions.
Download Python 2.7 from here: https://www.python.org/downloads/
Psycopg2 is a Python library that accesses the objects of the PostgreSQL server and allows the execution of PostGIS commands from Python.
Download psycopg2 from here: http://www.stickpeople.com/projects/python/win-psycopg/2.6.1/psycopg2-2.6.1.win32-py2.7-pg9.4.4-release.exe
PostGIS scripting with Python
Import the Python libraries:
import psycopg2
import subprocess
import sys, os
Set up input path and a loop that goes through all TIFs in the directory:
input_path = "C:\\Data\\Raster\\"

for raster in os.listdir(input_path):
    if raster.endswith(".tif"):
       name = raster.split(".tif")[0]
       raster = os.path.join(input_path, raster)
Connect to the PostgreSQL server:
       os.environ['PATH'] = r';C:\Program Files\PostgreSQL\9.4\bin'
       os.environ['PGHOST'] = 'localhost'
       os.environ['PGPORT'] = '5432'
       os.environ['PGUSER'] = 'postgres'
       os.environ['PGPASSWORD'] = 'postgres'
       os.environ['PGDATABASE'] = 'raster_database'

       rastername = str(name)
       rasterlayer = rastername.lower()

       conn = psycopg2.connect(database="raster_database", user="postgres", host="localhost", password="postgres")
       cursor = conn.cursor()
Import each raster through raster2pgsql function (coordinate system epsg code is set to 32633 UTM):
       cmds = 'raster2pgsql -s 32633 -t 2000x2000 "' + raster + '" |psql'
       subprocess.call(cmds, shell=True)
Now run any PostGIS command you like. In this example we run rescale the raster to 250m spatial resolution and reproject it from UTM 33N to WGS84 (epsg code 4326). At the end, the raster may be exported locally to *.hex data format. The export is optional, we could also convert the raster to CSV or numpy array.
       sql = "UPDATE " + rasterlayer + " SET rast = ST_Rescale(rast, 250, 'Near'); \
              UPDATE " + rasterlayer + " SET rast = ST_Transform(ST_SetSRID(rast,32633),4326);"
       cursor.execute(sql)
       conn.commit()

       rql = "COPY (SELECT encode(ST_AsTIFF(rast), 'hex') AS tif FROM " + rasterlayer + ") TO 'C:/Users/Data/" + rasterlayer + ".hex';"
       cursor.execute(rql)
       conn.commit()